最近某款小程序游戏广告铺天盖地,出于好奇和学习的目的体验了一下,果然“上头”——玩法简单却极其消磨时间。
游戏机制中,绝大多数活动都依赖“体力”系统:
- 体力每 5 分钟恢复 1 点;
- 每日 6:00、12:00、18:00、21:00 四个整点,可在“食堂”领取烤肉,每个烤肉恢复 30 点体力;
- 烤肉最多可存储 60 个(即上限 1800 点体力)。
由此可知:只要一段时间不登录,体力就会大量堆积。而手动清空这些体力,意味着长时间重复操作——堪称“肝帝专属任务”。
那么,能否实现自动化消耗体力?
从技术角度看,最高效的方式是直接调用游戏后端接口,通过抓包分析请求报文,构造自动化脚本。但这种方式风险极高——轻则触发风控,重则直接封号,得不偿失。
相比之下,模拟人类操作是最稳妥的方案:
- 行为符合正常用户路径;
- 不触及服务端逻辑,规避反作弊机制;
- 可实现“睡后挂机”,解放双手。
因此,我决定采用 基于 OpenCV 的图像识别 + 自动化点击 方案:
- 利用屏幕截图与模板匹配定位关键 UI 元素(如“开始战斗”、“领取烤肉”等按钮);
- 结合 PyAutoGUI 模拟鼠标点击,完成闭环操作。
此举一举两得:
一方面实现游戏挂机,高效清体力;
另一方面深入实践 OpenCV 在真实场景中的应用,“劳逸结合,边玩边学” (狗头)。
依赖安装
1
2
3
|
pip install pyautogui
pip install numpy
pip install cv2
|
基础知识
以下代码都放在这里 游戏自动化
点击事件
这款游戏主要就是靠鼠标点击,首先要了解 python 库 pyautogui ,此库允许 python 脚本控制鼠标和键盘,从而实现与其他应用程序的自动化交互。
 1
 2
 3
 4
 5
 6
 7
 8
 9
10
11
|
import pyautogui
import time


if __name__ == "__main__":
    # 在部分游戏比如小程序中,click 点击是无效的
    # pyautogui.click(366, 970)
    # 模拟鼠标点击
    pyautogui.mouseDown(366, 970)
    time.sleep(0.1)
    pyautogui.mouseUp(366, 970)
|
这样就完成点击操作,mouseDown 前 2 个参数分别表示 x 轴与 y 轴坐标。
在部分游戏,比如小程序中,click 点击是无效的,可能是游戏防止自动化的措施,拦截了相关操作,此时可以使用 mouseDown 和 mouseUp。
截屏与截取区域
全屏截取同样使用 pyautogui 库完成截屏操作,将数据转换为 opencv 的 BGR 色彩空间,pyautogui.screenshot() 返回的是 RGB 顺序,OpenCV 默认使用 BGR 颜色顺序,为了确保其他 OpenCV 函数能正确显示和处理,此处需要做转换操作。
为什么 OpenCV 采用 BGR 顺序呢?
据了解,历史原因 + 早期硬件/软件生态的影响,如果直接修改会导致旧代码颜色全部错乱,最终保留了 BGR 默认行为,延续至今。
这里还要学一个灰度图,to_gray 将图片转换为灰色处理,模板匹配的准确率会更高,颜色容易受到设备,光照,压缩等因素干扰,而灰度图只关注亮度结构,更稳定。
- 彩色图,3 通道(RGB),匹配时需要同时对齐 3 个维度,适合匹配形状一样,但色彩不一样,比如游戏中的 “蓝色药水” 与 “红色药水”,交通灯识别等。
- 灰度图,1 通道,问题简化,计算更稳定,适合按钮,图标,文字区域匹配等场景
截取区域的目的是缩小范围,一则降低误判,二则分析会更快,适合游戏窗口,人员入侵电子围栏标记等。
 1
 2
 3
 4
 5
 6
 7
 8
 9
10
11
12
13
14
15
16
17
18
19
20
21
22
23
24
25
26
27
28
29
30
31
32
33
34
35
36
37
38
39
40
41
|
import os
import pyautogui
import numpy as np
import cv2


# 截取屏幕
def capture_screen() -> cv2.typing.MatLike:
    screenshot = pyautogui.screenshot()
    # 转换为 OpenCV 格式
    frame = np.array(screenshot)  # PIL: RGB
    # 统一使用 OpenCV 的 BGR 色彩空间
    return cv2.cvtColor(frame, cv2.COLOR_RGB2BGR)


def to_gray(frame: cv2.typing.MatLike) -> cv2.typing.MatLike:
    # 输入已统一为 BGR
    return cv2.cvtColor(frame, cv2.COLOR_BGR2GRAY)


# 截取范围
def capture_screen_range(
    frame: cv2.typing.MatLike, x1: int, x2: int, y1: int, y2: int
) -> cv2.typing.MatLike:
    size = pyautogui.size()
    # 考虑 retina 高分辨率
    scale = frame.shape[1] / size.width
    x1 = int(x1 * scale)
    x2 = int(x2 * scale)
    y1 = int(y1 * scale)
    y2 = int(y2 * scale)
    return frame[y1:y2, x1:x2]


if __name__ == "__main__":
    name = "screenshot.png"
    os.remove(name)
    frame = to_gray(capture_screen())
    frame = capture_screen_range(frame, 0, 100, 0, 100)
    # 保存图片
    cv2.imwrite(name, frame)
|
macos 授权辅助功能权限
我使用 macos 操作游戏,截屏和点击事件需要对应的权限,可以通过代码检查是否存在权限,不存在权限时触发打开相关设置,提醒用户开启。
 1
 2
 3
 4
 5
 6
 7
 8
 9
10
11
12
13
14
15
16
17
18
19
20
21
22
23
24
25
26
27
28
29
30
31
32
33
34
35
36
37
38
39
40
41
42
43
44
45
46
47
48
49
50
51
52
53
54
55
56
57
58
59
60
61
62
63
64
65
66
67
68
69
70
71
72
73
74
75
76
77
78
79
80
81
82
83
84
85
|
import platform
import pyautogui
import subprocess
import time


# 检查 macos 是否获取了辅助功能权限
def check_accessibility_permission():
    """检查 macOS 辅助功能权限"""
    if platform.system() != "Darwin":  # 非 macOS 系统
        return True
    try:
        # 尝试获取辅助功能权限(通过尝试移动鼠标来测试)
        # 如果失败会抛出异常
        try:
            # 尝试获取鼠标位置(需要辅助功能权限)
            current_pos = pyautogui.position()
            print("✓ 辅助功能权限已授予")
            return True
        except Exception:
            pass

        # 使用 AppleScript 检查权限
        script = """
        tell application "System Events"
            try
                set UI elements enabled to true
                return "granted"
            on error
                return "denied"
            end try
        end tell
        """
        result = subprocess.run(
            ["osascript", "-e", script], capture_output=True, text=True, timeout=5
        )
        if "granted" in result.stdout.lower() or result.returncode == 0:
            print("✓ 辅助功能权限已授予")
            return True
        else:
            print("\n" + "=" * 60)
            print("⚠️  需要授予辅助功能权限才能执行点击操作!")
            print("=" * 60)
            print("\n正在打开系统设置页面...")
            try:
                subprocess.run(
                    [
                        "open",
                        "x-apple.systempreferences:com.apple.preference.security?Privacy_Accessibility",
                    ],
                    timeout=5,
                )
                print("✓ 已打开系统设置页面")
                print("\n请按照以下步骤操作:")
                print("1. 在系统设置中找到 '辅助功能'")
                print("2. 找到 Terminal 或 Python(取决于您使用的终端)")
                print("3. 勾选复选框以授予权限")
                print("4. 如果找不到,点击 '+' 按钮添加应用程序")
                print("\n授权完成后,脚本将自动继续...")
                print("=" * 60 + "\n")
                # 等待用户授权(最多等待60秒)
                for i in range(60):
                    time.sleep(1)
                    try:
                        current_pos = pyautogui.position()
                        print("✓ 权限已授予!继续运行...")
                        return True
                    except:
                        if i % 10 == 0:
                            print(f"等待授权中... ({i}/60秒)")
                print("⚠️  等待超时,请手动授权后重新运行脚本")
                return False
            except Exception as e:
                print(f"无法自动打开设置页面: {e}")
                print("\n请手动打开:系统设置 → 隐私与安全性 → 辅助功能")
                print("然后添加 Terminal 或 Python 并授予权限")
                return False
    except Exception as e:
        print(f"检查权限时出错: {e}")
        print("请确保已授予辅助功能权限")
        return False


if __name__ == "__main__":
    check_accessibility_permission()
|
以上代码有点长,主要是调用了 apple script。
OpenCV 模板匹配
定义的入参分别是截图,素材图片,准确度阈值。
匹配方法是 cv2.TM_CCOEFF_NORMED,采用归一化的相关系数匹配法,除非有特殊要求,否则一律用该方法即可,值越接近 1 越相似。
还有其它匹配方法,有些方法的值是越大越好,有些则是越小越好。 minMaxLoc的返回值在 cv2.TM_CCOEFF_NORMED 方法中,关注最大值即可,
最后是模板缩放匹配,为了适配不同屏幕(1080P,2K,4K) 会动态缩放 UI 元素, 素材图片的像素原始尺寸,可能在实际的游戏中进行了缩放,OpenCV 的 cv2.matchTemplate() 是严格基于像素对齐的,一旦实际显示尺寸 ≠ 模板尺寸,即使内容一模一样也可能匹配失败。
还有一个思路是让程序计算按钮相对位置,自动截图素材,这样准确率最高。
先试试原图,不够好再试试缩放,是成熟且高效的工程实践。
 1
 2
 3
 4
 5
 6
 7
 8
 9
10
11
12
13
14
15
16
17
18
19
20
21
22
23
24
25
26
27
28
29
30
31
32
33
34
35
36
37
38
39
40
41
42
43
44
45
46
47
48
49
50
51
52
53
54
55
56
57
58
59
60
61
62
63
|
# 比较图片相似度
def find_image(
    img1: cv2.typing.MatLike, img2: cv2.typing.MatLike, threshold: float = 0.8
):
    # 对图片进行预处理,提高匹配率
    # 转换为灰度图
    screen_gray = (
        cv2.cvtColor(img1, cv2.COLOR_BGR2GRAY) if len(img1.shape) == 3 else img1
    )
    target_gray = (
        cv2.cvtColor(img2, cv2.COLOR_BGR2GRAY) if len(img2.shape) == 3 else img2
    )
    # 比较宽高,如果模板比屏幕大,直接返回
    if (
        target_gray.shape[0] > screen_gray.shape[0]
        or target_gray.shape[1] > screen_gray.shape[1]
    ):
        return None

    method = cv2.TM_CCOEFF_NORMED

    result = cv2.matchTemplate(screen_gray, target_gray, method)
    # 矩阵中的最小数值,最大数值,最小值所在坐标,最大值所在坐标
    min_val, max_val, min_loc, max_loc = cv2.minMaxLoc(result)

    # 如果原始尺寸匹配度已经很高,直接返回
    if max_val >= threshold:
        h, w = target_gray.shape[:2]
        center_x = max_loc[0] + w // 2
        center_y = max_loc[1] + h // 2
        return (center_x, center_y, max_loc, target_gray.shape[:2])

    # 如果匹配度接近阈值,尝试多尺度匹配
    # 可能因为缩放了界面,或不同分辨率的屏幕上运行,导致匹配度不高
    if max_val >= 0.5:
        scales = [0.95, 1.05, 0.9, 1.1]
        for scale in scales:
            h, w = target_gray.shape[:2]
            scaled_h = int(h * scale)
            scaled_w = int(w * scale)
            # 检查尺寸是否有效
            if (
                scaled_h <= 0
                or scaled_w <= 0
                or scaled_h > screen_gray.shape[0]
                or scaled_w > screen_gray.shape[1]
            ):
                continue
            # 缩放模板
            scaled_target = cv2.resize(
                target_gray, (scaled_w, scaled_h), interpolation=cv2.INTER_AREA
            )
            # 执行模板匹配
            result = cv2.matchTemplate(screen_gray, scaled_target, method)
            min_val, max_val, min_loc, max_loc = cv2.minMaxLoc(result)
            if max_val >= threshold:
                # 计算中心点坐标,考虑缩放后的尺寸
                center_x = max_loc[0] + scaled_w // 2
                center_y = max_loc[1] + scaled_h // 2
                return (center_x, center_y, max_loc, target_gray.shape[:2])

    return None
|
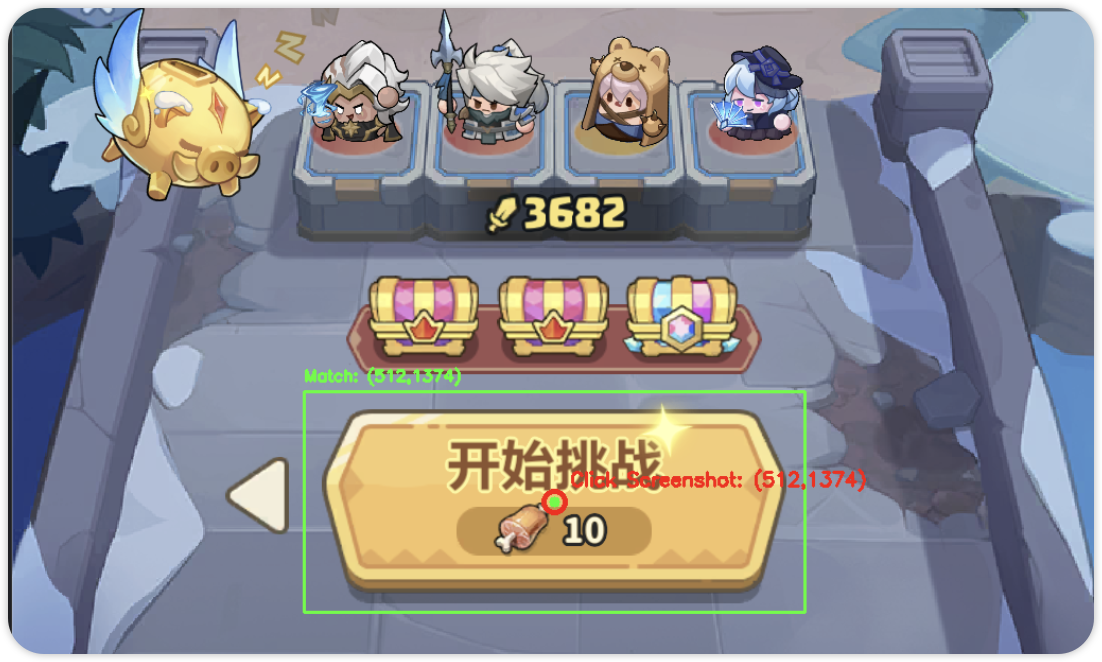
将找到的位置画框标记并保存图片
 1
 2
 3
 4
 5
 6
 7
 8
 9
10
11
12
13
14
15
16
17
18
19
20
21
22
23
24
25
26
27
28
|
# 画框
def draw_box(img: cv2.typing.MatLike, max_loc: cv2.typing.Point, size: tuple[int, int]):
    x, y = max_loc
    w, h = size
    x2 = x + w
    y2 = y + h
    center = (x + w // 2, y + h // 2)
    cv2.rectangle(img, (x, y), (x2, y2), (0, 255, 0), 2)
    cv2.putText(
        img,
        f"Match: ({center[0]},{center[1]})",
        (x, y - 10),
        cv2.FONT_HERSHEY_SIMPLEX,
        0.5,
        (0, 255, 0),
        2,
    )
    return img


  def save_image(
    screen: cv2.typing.MatLike, max_loc: cv2.typing.Point, size: tuple[int, int]
):
    img = screen.copy()
		# 画框
    draw_box(img, max_loc, size)
    # 保存图片
    cv2.imwrite("screenshot.png", img)
|
有了以上基础知识,其实就是拼积木一样,按照游戏的流程,识别对应的操作,触发点击即可。